How To Set Up an ASGI Django App with Postgres, Nginx, and Uvicorn on Ubuntu 20.04
Step-by-step guide to deploy Django ASGI on Ubuntu 20.04 with PostgreSQL, Gunicorn+Uvicorn, systemd socket activation, and Nginx reverse proxy.
Drake Nguyen
Founder · System Architect
Introduction
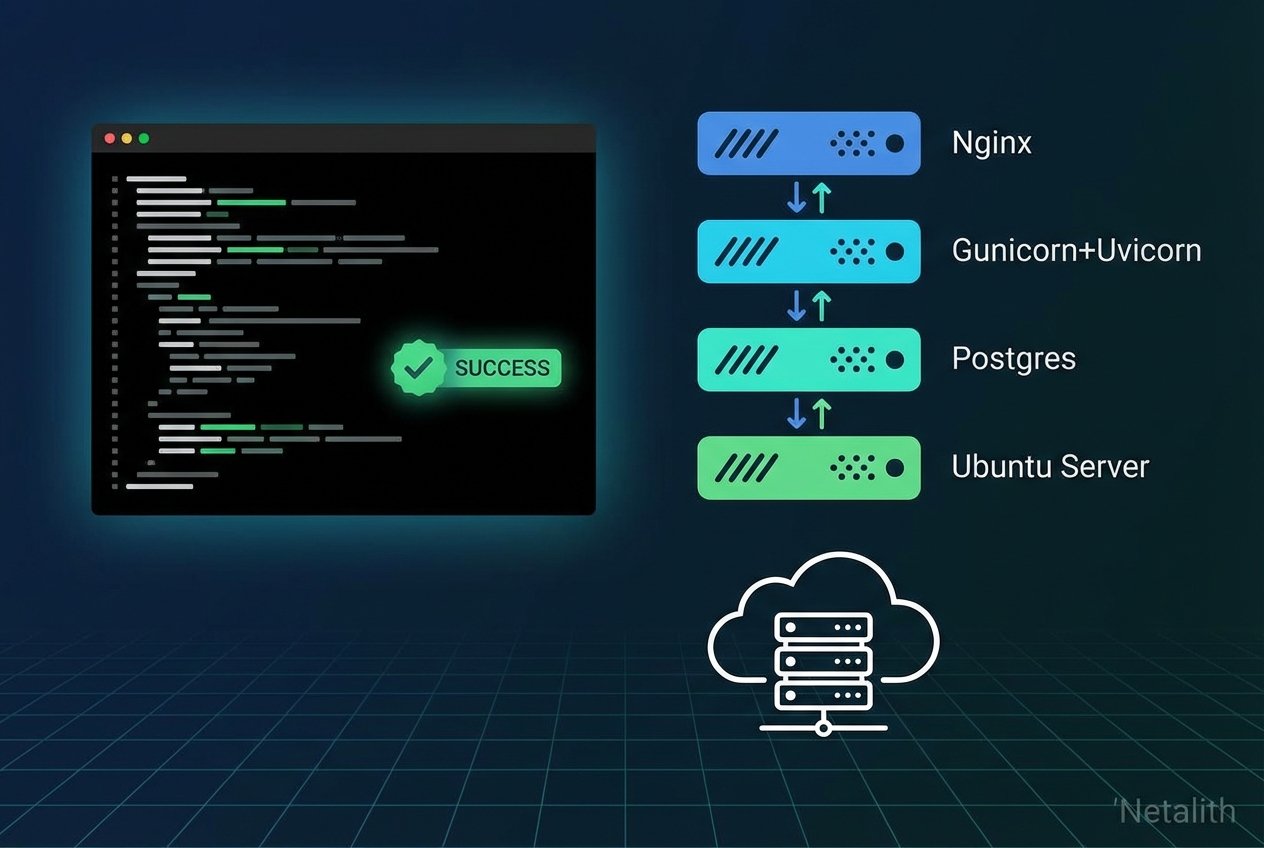
This guide shows how to deploy Django ASGI on Ubuntu 20.04 using PostgreSQL, Gunicorn with Uvicorn workers, and Nginx as a reverse proxy. It is aimed at developers and sysadmins preparing an Ubuntu 20.04 Django server for production. The instructions cover database setup, a Python virtual environment, configuring Gunicorn to run an ASGI application, creating systemd socket and service units, and configuring Nginx for proxying and static files.
Prerequisites
- An Ubuntu 20.04 machine with a non-root sudo user.
- Basic familiarity with the command line, Python, and Django.
- A registered domain (recommended) or a static IP to set ALLOWED_HOSTS and Nginx server_name.
Step 1 — Install required packages
Update apt and install system packages needed for a standard django postgres nginx setup, development tools, and the PostgreSQL server.
sudo apt update
sudo apt install python3-venv libpq-dev postgresql postgresql-contrib nginx curl
Step 2 — Create PostgreSQL database and user
Use the postgres administrative account to create a database and a dedicated user for your Django project. Configure sensible defaults for encoding and timezone so Django works smoothly.
sudo -u postgres psql
-- inside psql
CREATE DATABASE myproject;
CREATE USER myprojectuser WITH PASSWORD 'strong_password';
ALTER ROLE myprojectuser SET client_encoding TO 'utf8';
ALTER ROLE myprojectuser SET default_transaction_isolation TO 'read committed';
ALTER ROLE myprojectuser SET timezone TO 'UTC';
GRANT ALL PRIVILEGES ON DATABASE myproject TO myprojectuser;
\q
Step 3 — Create and activate a Python virtual environment
Keep dependencies isolated by using a virtual environment. Install Django, Gunicorn, Uvicorn, and the Postgres adapter inside it.
mkdir ~/myprojectdir && cd ~/myprojectdir
python3 -m venv myprojectenv
source myprojectenv/bin/activate
pip install --upgrade pip
pip install django gunicorn uvicorn psycopg2-binary
Step 4 — Start a Django project and configure settings
Create the project and update settings for production use: set ALLOWED_HOSTS, configure PostgreSQL in DATABASES, and define STATIC_ROOT so Nginx can serve static files.
django-admin startproject myproject ~/myprojectdir
# edit ~/myprojectdir/myproject/settings.py
# set ALLOWED_HOSTS = ['your_domain_or_IP', 'localhost']
# DATABASES -> use 'django.db.backends.postgresql' with NAME, USER, PASSWORD, HOST='localhost'
# add at bottom:
STATIC_URL = '/static/'
import os
STATIC_ROOT = os.path.join(BASE_DIR, 'static/')
Initialize the database schema, create a superuser, and collect static files:
cd ~/myprojectdir
python manage.py makemigrations
python manage.py migrate
python manage.py createsuperuser
python manage.py collectstatic
Step 5 — Confirm Gunicorn can serve the ASGI app
Gunicorn can orchestrate Uvicorn workers for ASGI applications. Test this locally before wiring up systemd or Nginx.
source ~/myprojectdir/myprojectenv/bin/activate
cd ~/myprojectdir
gunicorn --bind 0.0.0.0:8000 myproject.asgi -w 4 -k uvicorn.workers.UvicornWorker
Alternatively, run Uvicorn directly for a minimal ASGI server:
uvicorn myproject.asgi:application --host 0.0.0.0 --port 8080Step 6 — Create systemd socket and service for Gunicorn
Using systemd socket activation lets systemd open a Unix socket at boot and start Gunicorn on demand. Create two files: /etc/systemd/system/gunicorn.socket and /etc/systemd/system/gunicorn.service.
# /etc/systemd/system/gunicorn.socket
[Unit]
Description=gunicorn socket

[Socket]
ListenStream=/run/gunicorn.sock

[Install]
WantedBy=sockets.target
# /etc/systemd/system/gunicorn.service
[Unit]
Description=gunicorn daemon
Requires=gunicorn.socket
After=network.target
[Service]
User=youruser
Group=www-data
WorkingDirectory=/home/youruser/myprojectdir
ExecStart=/home/youruser/myprojectdir/myprojectenv/bin/gunicorn \
--access-logfile - \
-k uvicorn.workers.UvicornWorker \
--workers 3 \
--bind unix:/run/gunicorn.sock \
myproject.asgi:application
[Install]
WantedBy=multi-user.targetEnable and start the socket so the socket file appears and systemd will handle activation:
sudo systemctl start gunicorn.socket
sudo systemctl enable gunicorn.socket
Step 7 — Verify the socket and activation
Check the socket status and the presence of the Unix socket. If socket activation is working, systemd will start Gunicorn when a connection hits the socket.
sudo systemctl status gunicorn.socket
file /run/gunicorn.sock
# trigger socket activation from the shell
curl --unix-socket /run/gunicorn.sock localhost
sudo systemctl status gunicorn
Step 8 — Configure Nginx as a reverse proxy
Create an Nginx server block that serves static files and proxies application requests to the Gunicorn Unix socket. This is a common pattern for django production deployment and nginx reverse proxy django setups.
sudo nano /etc/nginx/sites-available/myproject

# example server block
server {
    listen 80;
    server_name your_domain_or_IP;

    location = /favicon.ico { access_log off; log_not_found off; }
    location /static/ {
        root /home/youruser/myprojectdir;
    }

    location / {
        include proxy_params;
        proxy_pass http://unix:/run/gunicorn.sock;
    }
}
Enable and test Nginx, then open the firewall for web traffic:
sudo ln -s /etc/nginx/sites-available/myproject /etc/nginx/sites-enabled
sudo nginx -t
sudo systemctl restart nginx
sudo ufw allow 'Nginx Full'
# remove dev server rule if present
sudo ufw delete allow 8000
Step 9 — Common troubleshooting
If you see Nginx’s default page, confirm the server_name matches your domain or IP. For 502 errors, check both Nginx error logs and systemd/Gunicorn logs. Common checks include the socket path, file permissions, and that Gunicorn is actually running.
sudo tail -F /var/log/nginx/error.log
sudo journalctl -u gunicorn -b
# verify socket permissions
namei -l /run/gunicorn.sock
Also verify PostgreSQL is running if Django raises OperationalError about connecting to the database:
sudo systemctl status postgresql
sudo systemctl start postgresql
sudo systemctl enable postgresql
Conclusion
Following these steps provides a reproducible approach to deploy django asgi on ubuntu 20.04 with production-grade components: PostgreSQL for data storage, Gunicorn orchestrating Uvicorn ASGI workers, systemd socket activation to manage processes, and Nginx as a reverse proxy serving static files. Harden the server further by enabling TLS (Let's Encrypt) and tightening UFW rules before sending real traffic to this Ubuntu 20.04 Django server.
Tip: Use journalctl and Nginx logs together when diagnosing issues — they usually point directly to configuration mismatches such as socket paths, permissions, or database credentials.