VLAN Basics: What VLANs Are, Why They Exist, and How to Use Them in Network Design
Evergreen guide to VLAN basics covering what VLANs are, why they exist, 802.1Q tagging, access vs trunk ports, native VLANs, inter-VLAN routing, best practices, and troubleshooting.
Drake Nguyen
Founder · System Architect
Introduction — VLAN basics and what this guide covers
VLAN basics are the foundational concepts behind Virtual LANs (VLANs): how they logically segment a switched network, why that matters for security and performance, and how you connect VLANs together safely. In this guide, you’ll learn what a VLAN is used for, how segmentation benefits network design, and where key concepts like broadcast domain reduction fit in.
If you’re building networking fundamentals, VLANs connect directly to IP addressing and subnetting basics and to routing vs switching. You’ll also see practical configuration patterns and troubleshooting checks you can practice in a home lab.
VLAN basics: What is a VLAN?
A VLAN (Virtual LAN) is a logical partition on a switch that creates separate Layer 2 broadcast domains. Even if devices share the same physical switch, VLANs make them behave like they’re on different networks by controlling which ports can exchange frames at Layer 2.
In practice, virtual LAN basics help you group users, devices, and servers by function (for example, Staff, Guest, IoT, Servers) without changing cabling. The result is cleaner network segmentation and fewer broadcasts reaching endpoints that don’t need them.
Key terms — VLAN, broadcast domain, switch VLAN, and 802.1Q
- VLAN: A logical LAN identified by a VLAN ID (typically 1–4094).
- Broadcast domain: Devices that receive broadcasts (for example, ARP). VLANs limit broadcasts to members of the same VLAN.
- Switch VLAN: How a switch assigns VLAN membership to ports and interfaces.
- 802.1Q: The Ethernet standard for VLAN tagging across trunk links.
Why VLANs exist — benefits for network design
Understanding VLAN basics starts with the “why.” VLANs exist because most networks need logical separation without duplicating physical infrastructure. Done well, VLANs improve security posture, simplify operations, and support scalable design.
Security and isolation benefits
Network segmentation reduces risk by limiting which devices can directly communicate at Layer 2. For example, a Guest VLAN can be isolated from internal subnets, and a Servers VLAN can be reachable only through tightly controlled inter-VLAN routing policies (ACLs or firewall rules). One of the most common VLAN mistakes is assuming VLAN separation alone equals security—controls at Layer 3 are still required.
Performance and broadcast domain reduction
VLANs also reduce unnecessary broadcast traffic. Smaller broadcast domains mean fewer endpoints processing ARP and other L2 broadcasts, which can improve performance and stability—especially as networks grow.
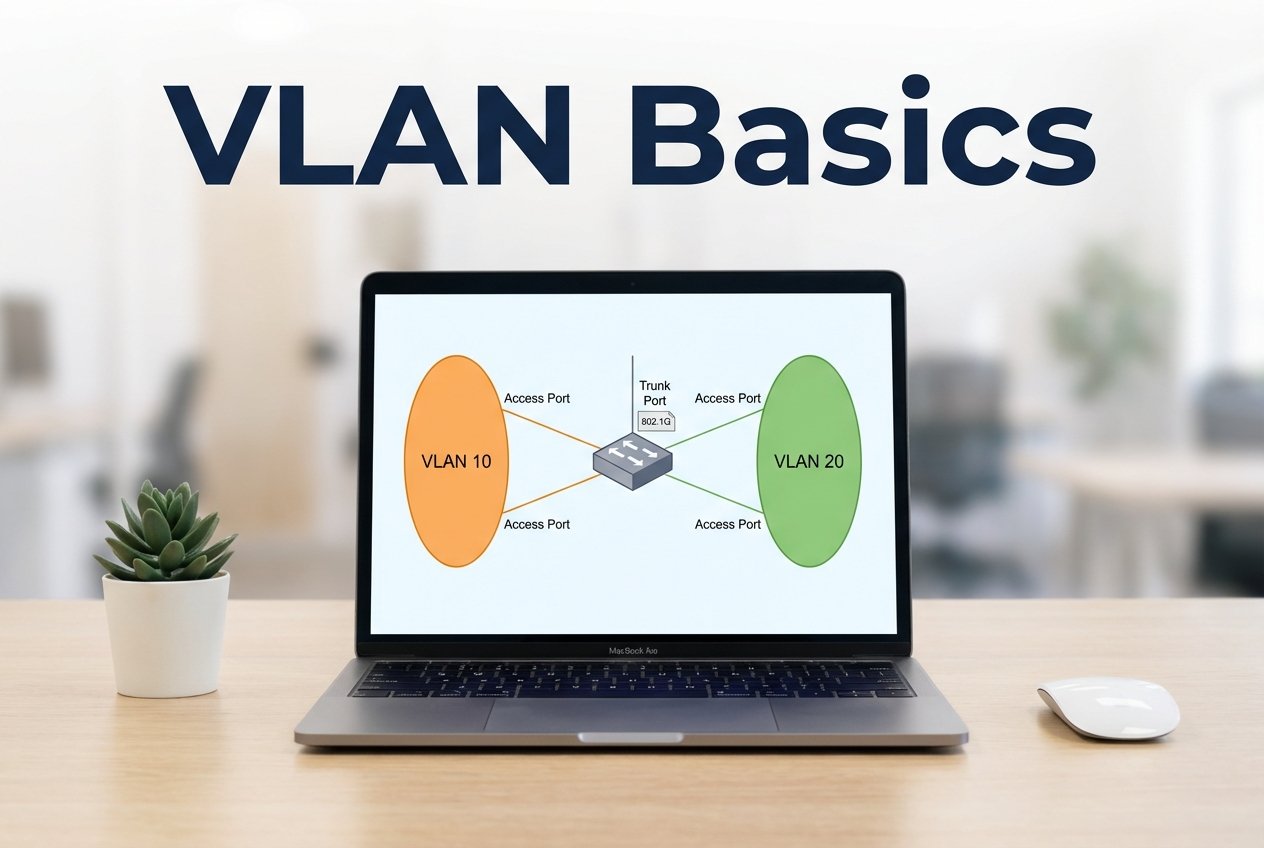
How VLANs work: VLAN tagging explained (802.1Q) and access vs trunk ports
To apply VLANs across multiple switches (or to a router), you need to understand VLAN tagging explained and the difference between an access port and a trunk. These mechanics are central to VLAN fundamentals in real networks.
802.1Q and VLAN tagging explained
802.1Q inserts a tag into Ethernet frames to carry the VLAN ID over a shared link. When traffic crosses a trunk, frames are typically sent tagged with the correct VLAN ID so the receiving switch knows which VLAN to forward within.
Frames that are untagged on a trunk are associated with the native VLAN. Because mismatched native VLANs can cause security and connectivity problems, native VLAN handling should be explicitly designed and documented.
Access ports vs trunk ports (including native VLAN
Access ports belong to a single VLAN and send/receive untagged frames—typical for end devices like PCs, printers, or access points (when not using multiple SSIDs/VLANs). Trunk ports carry multiple VLANs between switches or to a router/Layer 3 switch using 802.1Q tags. A frequent mistake is leaving trunk negotiation or allowed VLANs too permissive; instead, explicitly define the trunk’s allowed VLAN list and native VLAN behavior.
Inter-VLAN routing and connectivity
VLAN basics also include a key limitation: VLANs are separate Layer 2 domains, so devices in different VLANs cannot communicate without routing. Inter-VLAN routing enables controlled communication between VLAN subnets while preserving broadcast separation.
This is where routing vs switching becomes practical: switching forwards frames within a VLAN, while a router or Layer 3 switch forwards packets between VLAN interfaces (typically using SVIs or routed ports).
Router-on-a-stick vs Layer 3 switching
- Router-on-a-stick: One physical router interface uses multiple subinterfaces (one per VLAN) and receives tagged traffic over a trunk. It’s common in small environments and labs.
- Layer 3 switching: A multilayer switch routes between VLANs internally (often with SVIs). It’s typically more scalable and higher performance for campus networks.
Choose based on throughput needs, fault domains, and how much policy enforcement you want centralized on a firewall vs distributed on a Layer 3 core.
Best practices and common VLAN mistakes
VLAN basics for beginners are easier when you follow consistent standards. These practices reduce outages and make troubleshooting faster:
- Avoid using the default VLAN (often VLAN 1) for user traffic; reserve it for control/management only when appropriate to your environment.
- Use consistent naming conventions and document VLAN IDs, subnets, DHCP scopes, and purpose.
- Enforce segmentation with Layer 3 controls (ACLs/firewall rules); don’t rely on VLANs alone for security.
- Plan one IP subnet per VLAN to simplify routing and reduce confusion.
- Harden trunks: disable unused trunking features, set an explicit allowed VLAN list, and define native VLAN behavior.
Naming, documentation, and IP/subnet planning
Strong documentation is part of VLAN fundamentals. Track VLAN-to-subnet mappings and where services live (DNS and DHCP explained in your network docs), and note where NAT and port forwarding apply at the perimeter. When applications must traverse VLAN boundaries, record the required TCP vs UDP ports and protocols to keep firewall and ACL rules precise.
Simple example: Designing VLANs for a small office
This simple design shows VLAN basics applied to a small office with staff devices, guest Wi‑Fi, and internal servers:
- VLAN 10 — Staff — 192.168.10.0/24
- VLAN 20 — Guest — 192.168.20.0/24 (Internet-only via ACLs/firewall rules)
- VLAN 30 — Servers — 192.168.30.0/24 (restricted access)
This segmentation reduces broadcast noise, improves security boundaries, and keeps growth manageable without adding extra physical switches.
Step-by-step switch configuration (access and trunk examples
Below are vendor-neutral example patterns showing an access port and a trunk. Adapt syntax to your platform and verify the allowed VLAN list and native VLAN settings match your design.
! Create VLANs
vlan 10
 name Staff
vlan 20
 name Guest
vlan 30
 name Servers

! Configure access port for a staff PC
interface GigabitEthernet0/1
 switchport mode access
 switchport access vlan 10

! Configure trunk between switches
interface GigabitEthernet0/24
 switchport mode trunk
 switchport trunk allowed vlan 10,20,30
 ! Optional: explicitly set native VLAN if required by your design
 ! switchport trunk native vlan 999
Troubleshooting tips and common tools
- Verify port mode: is the interface truly an access port or a trunk?
- Check the trunk’s allowed VLAN list and confirm the VLAN exists on both sides.
- Confirm native VLAN consistency to avoid untagged traffic landing in the wrong VLAN.
- Validate inter-VLAN routing: SVIs/subinterfaces up, correct gateways, and ACL/firewall rules permitting required traffic.
- Use show commands, MAC address tables, ARP tables, and packet captures to confirm tagging and path.
FAQ — short answers to common beginner questions
What is a VLAN used for?
A VLAN is used for network segmentation: separating groups of devices into different broadcast domains on shared switching hardware for security, performance, and manageability.
Do VLANs require a router?
VLANs themselves don’t require a router to exist, but communication between VLANs requires inter-VLAN routing via a router, firewall, or Layer 3 switch.
What’s the difference between an access port and a trunk?
An access port carries traffic for one VLAN (untagged). A trunk carries traffic for multiple VLANs using 802.1Q tags, with untagged frames assigned to the native VLAN.
Conclusion — VLAN basics key takeaways and next steps
VLAN basics come down to smart Layer 2 segmentation: smaller broadcast domains, clearer security boundaries, and cleaner network design. Next steps: map your VLANs to subnets, define trunk rules and native VLAN behavior, and implement inter-VLAN routing with explicit ACL/firewall policies so segmentation benefits are preserved.